How to install Cyanogenmod 7.2 for Samsung Galaxy Ace

Posted by Unknown Senin, 30 April 2012 0 komentar
Hey guys, today i am gonna show you how to install Cyanogenmod 7.2 for your Samsung Galaxy Ace. With Cyanogenmod 7.2, you will have a louder sms volume, a better Operating System, a smoother gameplay on your phone, and other benefits. You may share this to your friends if he/she want to makes his/her Galaxy Ace better and smarter.

 Note: You have to install CWM 5 to your phone before doing this steps (I have shown before).

1. You have to download the latest official Cyanogenmod .zip file from here.

2. Then download another Gapps.zip file from here.

3. Backup your phone contact and apps [with Super SMS & contacts backup (can be downloaded
    from play store) and Titanium backup which i hv shown you how to use on my older post] before
    you do this (upgrading to cyangenmod 7.2 requires you to factory reset your phone).


4. Connect your phone to your computer copy the 2 .zip files to your phone.


5. Power off your phone after disconnecting with your computer.

6. Open your phone's recovery screen (I have shown you on my older post 'How to root Samsung
    Galaxy Ace'.

7. Choose 'wipe data/factory reset' and wait for it to complete itself.

8. Choose the 'install zip from sdcard'.

9. Select the cyanogenmod 7.2 signed.zip to install first, then install the gapps.zip.

10. Choose 'reboot system now' to reboot your phone.

11. This time of rebooting your phone may take longer time, just be patience.

12. Then your phone will be upgraded to Cyanogenmod 7.2 in no time.

13. Remember not to use S2E to your phone because this will cause several force close problem to
      your phone so be wise to avoid that (I have tried).

14. Thanks for viewing my blog, subscribe my blog and follow it, if you feels my blog is not bad,
      thanks.

For the later posts probably i will post some apps that can cover Cyanogenmod's disadantages such as the messaging apps and others.

Feel free to donate to me if this new ROM really helps u, your kindness will be my future trust force.

Baca Selengkapnya ....

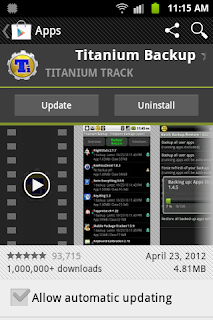
How to use Titanium backup for rooted android phone

Posted by Unknown Sabtu, 28 April 2012 0 komentar
Titanium backup is quite important for android users when they are preparing to do anything important to phone, such as flashing new ROM to your phone and others, so how to use Titanium backup before we make changes to our phone? Here's the steps:

1. You have to download Titanium backup, an apps from play store or get the premium version here.


2. Install it and open it, you will see many strange things.


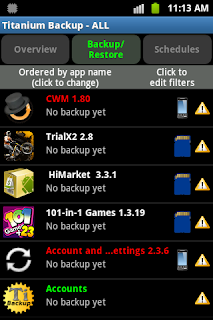
3. Just simply click the 'Backup/Restore' button on the top of your screen.


4. Then press your menu key, and select the 'Batch'.


5. If you want to backup your apps and system data, you can choose 'Backup all user apps + system
    data'


6. Then wait for the process to finish, note that this will cost you quite long time if you hv installed
    too many apps to your phone.

7. If you want to restore your apps and system data after you make some changes to your phone, you
    may choose 'Restore missing apps and all system data' from the 'Backup/Restore' screen.


8. Just install the apps again to your phone when it prompts you an installation screen.

9. Your phone will now be like before with all data of your apps.

10. Thanks for watching my blog, please subscribe me if you like my posts.

Baca Selengkapnya ....

Deodexing? Fundamental and How to.

Posted by Unknown Kamis, 26 April 2012 0 komentar

Well , since most customization for custom roms require a deodex device , lets first understand the fundamental of the file naming system in android devices. Below is the understanding of the odex and deodex file. Well some of us wanted to use stock rom but to have the ability to customized it with theme and a few other mods. So here a fundamental of it and how to deodex your system.

WHAT IS AN ODEX FILE?
In Android file system, applications come in packages with the extension .apk. These application packages, or APKs contain certain .odex files whose supposed function is to save space. These ‘odex’ files are actually collections of parts of an application that are optimized before booting. Doing so speeds up the boot process, as it preloads part of an application. On the other hand, it also makes hacking those applications difficult because a part of the coding has already been extracted to another location before execution.

THEN COMES DEODEX
Deodexing is basically repackaging of these APKs in a certain way, such that they are reassembled into classes.dex files. By doing that, all pieces of an application package are put together back in one place, thus eliminating the worry of a modified APK conflicting with some separate odexed parts.
In summary, Deodexed ROMs (or APKs) have all their application packages put back together in one place, allowing for easy modification such as theming. Since no pieces of code are coming from any external location, custom ROMs or APKs are always deodexed to ensure integrity.

HOW THIS WORKS
For the more geeky amongst us, Android OS uses a Java-based virtual machine for running applications, called the Dalvik Virtual Machine. A deodexed, or .dex file contains the cache used by this virtual machine (referred to as Dalvik-cache) for a program, and it is stored inside the APK. An .odex file, on the other hand, is an optimized version of this same .dex file that is stored next to the APK as opposed to inside it. Android applies this technique by default to all the system applications.
Now, when an Android-based system is booting, the davlik cache for the Davlik VM is built using these .odex files, allowing the OS to learn in advance what applications will be loaded, and thus speeds up the booting process.
By deodexing these APKs, a developer actually puts the .odex files back inside their respective APK packages. Since all code is now contained within the APK itself, it becomes possible to modify any application package without conflicting with the operating system’s execution environment.

ADVANTAGES & DISADVANTAGES
The advantage of deodexing is in modification possibilities. This is most widely used in custom ROMs and themes. A developer building a custom ROM would almost always choose to deodex the ROM package first, since that would not only allow him to modify various APKs, but also leave room for post-install theming.
On the other hand, since the .odex files were supposed to quickly build the dalvik cache, removing them would mean longer initial boot times. However, this is true only for the first ever boot after deodexing, since the cache would still get built over time as applications are used. Longer boot times may only be seen again if the dalvik cache is wiped for some reason.
For a casual user, the main implication is in theming possibilities. Themes for android come in APKs too, and if you want to modify any of those, you should always choose a dedoexed custom ROM.

GUIDE TO DEODEX YOUR DEVICE
##Your Device Must be rooted for this process
##You need android-sdk installed in your computer
##You need to install latest busybox in your phone
  Things needed:-

xUltimate ( Click here to download )

Let's Begin

1.Connect your phone to computer.(Make sure you have select USB debugging in Settings>Applications>Development)

2.Extract xUltimate v2.3.3.zip and Launch Main.exe

3.If everything goes well xUltimate should recognize the phone and make a connection.You now should see a list of options.

4.Select option (1) pull /system/app. Wait until it complete.

5.Select option (2)pull /system/framework. Wait until it complete.

6.Then select option (3) Deodex /system/app. Wait until it complete.
[If encounter any error. Find out which .odex file is it. Then remove .odex file from folder origi_app in xUltimate folder]

7.Then select option (4)Deodex /system/framework. Wait until it complete.

8.Now Exit from xUltimate.

9.Put the phone in USB mass storage.

10.Go to xUltimate folder and copy "done_frame", and "done_app", and move them to the root of the sdcard.

11.Now get out from USB storage mode.

12.Open Command prompt.
( Goto folder where android sdk installed. Then goto platform-tools folder in it. Right click on free space in folder while pressing shift key.Select open command prompt here.
Now enter commands. )

13.Enter following codes.
(if you are using adb shell in su for the first time, keep phone screen on. After entering "su" code, super user request prompt in phone. Press allow )

Code:
============================================================
adb shell
su
stop mount -o rw,remount /system/ /system/
cp /sdcard/done_app/* /system/app/
rm /system/app/*.odex
cp /sdcard/done_frame/* /system/framework/
rm /system/framework/*.odex
mount -o ro,remount /system/ /system/
reboot
============================================================
14.Now you have deodexed rom.

Baca Selengkapnya ....

How to install CWM 5 for your android phone

Posted by Unknown Rabu, 25 April 2012 0 komentar
This is mostly for Galaxy Ace, but you still may try it, because someone got it success in Galaxy S Plus.

1. You have to download the zip file from here

2. Just copy that zip file to your sd card via your computer.


3. Reboot your phone into recovery mode (this skill i have shown you on my older post).

4. Then, choose the option 'apply update from sdcard'.

5. Select your zip file with your phone's VOLUME UP and DOWN button and press HOME KEY to     select.

6. Patiently wait for it's installation to run, and it should be quite fast.

7. You have to choose 'reboot system now' to reboot your phone.


8. Congratulation, our phone has been pdated to CWM 5 from now on.

9. Remember that you should do it at your own risk, and thanks for watching.

Baca Selengkapnya ....

How to root Samsung Galaxy Ace

Posted by Unknown Minggu, 22 April 2012 0 komentar
First you have to download this Root.zip from web, here is the link:

http://www.mediafire.com/?jll4ojf4j3o972v

Copy this files to wherever of your sd card.


Then, you have to power off your phone.


After powering off your device, just HOLD the HOME button and the LOCK KEY button.

Hold until a recovery screen comes out.

Choose 'apply update from sd card'.

Use the VOLUME UP and DOWN button to choose your Root.zip file.

Then use your HOME key to apply'

Wait till it says 'Install from sdcard complete'

Then choose reboot system now.

Then a new app will appear on your app drawer, superuser.

Now your phone has been rooted.

Think caefully before you do all this things, and do it at your own risk.

Thanks for viewing my blog.

Baca Selengkapnya ....

How to use Setcpu for android rooted phone

Posted by Unknown 0 komentar
Hey guys, this is my first blog, so i m gonna show you how to make your android faster and smoother.

Today, i will show you how to download and use setcpu v2.2.4 for your android phone.
Note: this is only valid for android 1.6+ and rooted users.

For the first step you will have to install your setcpu v 2.2.4.

Then, choose 'Autodetect Speeds Recommended' from the several choices given:


After that, just drag the upper meter to the end if you want your device to be always at max speed:


Then, you can check the 'Set on Boot', a small box at the bottom left of the screen.

After that if you want your device to maintain at max frequency for most of the time, you may change the option at the bottom right screen to 'performance':


Just like this

Then you may set some profiles for your phone to auto adjust the cpu frequency at certain circumstances:


Just like this.

So thanks for viewing my blog and please help me to share my blog out if you think that my blog is not bad at all.


Setcpu v2.2.4 download link: http://www.4shared.com/file/XGpO2jwt/SetCPU_Root_224.htm

Baca Selengkapnya ....

Google Android Hidden Secret Codes

Posted by Unknown Rabu, 18 April 2012 0 komentar
So in this topic, you'll get several hidden secret codes which can be used in any Google Android mobile phone to access things which are not accessible by default.
FYI These codes have been obtained by decoding various .apk files present in the phone firmware. 

DISCLAIMER: This information is intended for experienced users. It is not intended for basic users, hackers, or mobile thieves. Please do not try any of following methods if you are not familiar with mobile phones. We'll not be responsible for the use or misuse of this information, including loss of data or hardware damage. So use it at your own risk.


*#*#4636#*#*
This code can be used to get some interesting information about your phone and battery. It shows following 4 menus on screen:
  • Phone information
  • Battery information
  • Battery history
  • Usage statistics

*#*#7780#*#*
This code can be used for a factory data reset. It'll remove following things:
  • Google account settings stored in your phone
  • System and application data and settings
  • Downloaded applications
It'll NOT remove:
  • Current system software and bundled applications
  • SD card files e.g. photos, music files, etc.
PS: Once you give this code, you get a prompt screen asking you to click on "Reset phone" button. So you get a chance to cancel your operation.

*2767*3855#
Think before you give this code. This code is used for factory format. It'll remove all files and settings including the internal memory storage. It'll also reinstall the phone firmware.
PS: Once you give this code, there is no way to cancel the operation unless you remove the battery from the phone. So think twice before giving this code.
*#*#34971539#*#*
This code is used to get information about phone camera. It shows following 4 menus:
  • Update camera firmware in image (Don't try this option)
  • Update camera firmware in SD card
  • Get camera firmware version
  • Get firmware update count
WARNING: Never use the first option otherwise your phone camera will stop working and you'll need to take your phone to service center to reinstall camera firmware.
*#*#7594#*#*
This one is my favorite one. This code can be used to change the "End Call / Power" button action in your phone. Be default, if you long press the button, it shows a screen asking you to select any option from Silent mode, Airplane mode and Power off.
You can change this action using this code. You can enable direct power off on this button so you don't need to waste your time in selecting the option.

*#*#273283*255*663282*#*#*
This code opens a File copy screen where you can backup your media files e.g. Images, Sound, Video and Voice memo.

*#*#197328640#*#*
This code can be used to enter into Service mode. You can run various tests and change settings in the service mode.

WLAN, GPS and Bluetooth Test Codes:
*#*#232339#*#* OR *#*#526#*#* OR *#*#528#*#* - WLAN test (Use "Menu" button to start various tests)
*#*#232338#*#* - Shows WiFi MAC address
*#*#1472365#*#* - GPS test
*#*#1575#*#* - Another GPS test
*#*#232331#*#* - Bluetooth test
*#*#232337#*# - Shows Bluetooth device address

*#*#8255#*#*
This code can be used to launch GTalk Service Monitor.

Codes to get Firmware version information:
*#*#4986*2650468#*#* - PDA, Phone, H/W, RFCallDate
*#*#1234#*#* - PDA and Phone
*#*#1111#*#* - FTA SW Version
*#*#2222#*#* - FTA HW Version
*#*#44336#*#* - PDA, Phone, CSC, Build Time, Changelist number

Codes to launch various Factory Tests:
*#*#0283#*#* - Packet Loopback
*#*#0*#*#* - LCD test
*#*#0673#*#* OR *#*#0289#*#* - Melody test
*#*#0842#*#* - Device test (Vibration test and BackLight test)
*#*#2663#*#* - Touch screen version
*#*#2664#*#* - Touch screen test
*#*#0588#*#* - Proximity sensor test
*#*#3264#*#* - RAM version

Baca Selengkapnya ....

Chrome for Android Update

Posted by Unknown Selasa, 17 April 2012 0 komentar

(Cross posted on the Google Chrome Blog)

Since we launched Chrome for Android Beta in February, we’ve been listening closely to all of your feedback (thank you!). It’s great to hear how so many of you love having the Chrome experience on your Android 4.0 phone or tablet.

With today’s update, Chrome for Android Beta is now available in 31 more languages and in all countries where Google Play is available. We’ve also added many much-requested features, including:

  • You can now request the desktop version of a website, in case you would rather not view the mobile version.
  • You can now add bookmarks as shortcuts on your home screen, so you can get to your favorite sites faster.
  • Choose your favorite apps to handle links opened in Chrome.
  • Have a proxy setup for Wi-Fi access? You can now use Chrome with the system proxy configured in Android settings.

If you build websites, you may want to take note of a change in the User-Agent specification for Chrome for Android.

If you haven’t already, you can install Chrome for Android Beta from Google Play on your Android 4.0 (Ice Cream Sandwich) phone or tablet. As we're still in Beta, we look forward to your feedback so we can continue to improve Chrome for Android.

Posted by
Dan Alcantara and Oli Lan, Software Engineers on Chrome for Android


Baca Selengkapnya ....

Google Currents goes international

Posted by Unknown Rabu, 11 April 2012 0 komentar

In December we launched Google Currents, an app for Android and iOS devices that lets you explore online magazines and other content with the swipe of a finger. We’re thrilled by how many readers and publishers are using the app in the U.S. -- nearly 400 publisher editions and over 14,000 self-produced editions are now available.

After the U.S. launch, the top features readers requested were to make the app available internationally and to allow content to sync quickly. We’ve heard you, and today we’re making Google Currents 1.1 available around the world. Hundreds of U.S. editions are now readable in your preferred language with a new publisher-selected translation feature, and local publishers can begin adding their content to the catalog through Google Currents Producer. Plus, a new dynamic sync feature improves your reading experience with fresh content wherever you are.

Whatever you’re interested in -- whether it’s science (Popular Science, Scientific American, Space.com), sports (Bleacher Report, CBS Sports, Surfer), business (Harvard Business Review, Inc.), celebrities (Celebuzz, HollywoodLife, Now magazine, TMZ), health & wellness (Men’s Health, Yoga Journal), design (Colossal, Dwell) or news (The Atlantic, PRI, Slate) -- it’s easy to find a great edition to read in Google Currents.

Read in more places

With this update, we’ve made Google Currents available globally, wherever apps are available on Google Play and the Apple App Store. International publishers, using Google Currents Producer, can now begin adding local content for an international audience, choosing where to make it available globally and whether to enable auto-translation. For example The Guardian in the UK, LaStampa in Italy, Financial Times Deutschland in Germany, ABC News in Australia, Neue Zürcher Zeitung in Switzerland and Hindustan Times in India have already started publishing editions with local content. Readers can also add their favorite local blogs which are instantly converted into Currents editions.

Read in your favorite language

To help you enjoy content in your preferred language, we’ve integrated Google Translate into Google Currents. Just press the globe icon while reading an edition, and you can automatically translate that edition to one of 38 supported languages. So it’s easier than ever to keep up with Italian and German sports (Corriere dello Sport, kicker.de), or read Scientific American, in your preferred language.

Read fresh content, automatically

With our new dynamic sync feature, you’ll always have fresh content to read. As you open each edition, new content is dynamically delivered, using a minimum of your phone or tablet's battery, bandwidth and storage. Those of you who travel on planes and trains can choose which editions you would like fully packaged for offline reading, including images.

Learn more about what’s new in Currents here.

Google Currents is now available for download on Google Play and in the Apple App Store, wherever apps are available. Whether you’re a reader or a publisher, we hope that Google Currents helps you easily experience the best content on the web, now in even more languages.

Posted by Mussie Shore, Product Manager


Baca Selengkapnya ....

Record Android Screen With ScreenCast & Screen Recorder For Android

Posted by Unknown Senin, 02 April 2012 0 komentar
While the iPhone got its first screen recording app back in early 2010, Android is only getting a proper screen recording solution today. Well, it’s better late than never, as the screen recording app released today does a whole lot more than simple screen recording: it’s called ScreenCast & Screen Recorder and, well, it lets you record your phone’s screen and take screenshots.

From Android Market:
Screencast records your phone screen at high frame rates into a high quality MPEG4 video. This program includes a gallery to view, play, rename, delete and share your previously recorded videos from within the same user interface.
Screenshot and live streaming are under development and will be appearing soon.
Screencast requires a ***ROOTED*** device to operate properly.
Click here to root your phone if your phone not rooted yet.
We’ve personally tested the app on our rooted Samsung Galaxy Wonder GT-I8150 and can confirm that it works as advertised. We strongly recommend this app.


Because of it requires Superuser permissions, you must have a rooted Android smartphone for this to work. Download links below:


Download ScreenCast & ScreenRecord FREE


Download ScreenCast & ScreenRecord PAID [Cracked]
Mediafire
Jumbofiles
UFile

Baca Selengkapnya ....
Trik SEO Terbaru support Online Shop Baju Wanita - Original design by Bamz | Copyright of android ipad.